Take control of your APIs by implementing API Governance — Using RAML & Node.js


tl;dr: We have close to 50 developers working on 20+ microservices. Most of the APIs developed were inconsistent, lacked REST conventions and sometimes had security vulnerabilities. The API review process was manual and time taking. Therefore our Frontend developers had to wait until the backend code get’s deployed to start the development process. To solve this, we implemented API Governance. We automated the whole process to ensure review and validation are done in realtime.
API governance helps save time and money because it enables consistency across APIs, allows components to be reused, and ensures that APIs are built proactively to achieve specific goals and bring value to the business.
What should API Governance include?
- Centralization: A central point where policies are created and enforced.
- Reusability: Standardizing API design not only ensures that APIs are consistent across an organization but also contains reusable components.
- Automation: API contracts, documentation, and tracking are processes that can be automated and should be part of overall API governance
- Versioning: Helps developers keep track of and maintain different versions of APIs.
- Deprecation Policy: Versioning effectively helps make deprecating APIs much easier.
- Tracking: Track where APIs are deployed, who are using the APIs, how the APIs are being used, routing information, and other elements of the API lifecycle.
- API Discovery: As the number of APIs and governance tooling grows, it is necessary to provide a means to easily search for and discover deployed APIs and the tooling currently in use.
There are lots of tools out there that help you achieve this. Swagger Hub being popular than others. Swagger Hub supports OpenAPI specification (formerly knows as Swagger) as well as older swagger versions. We at Zolostays Engineering Team chose to go ahead with RAML instead.

> RESTful API Modeling Language (RAML) makes it easy to manage the whole API lifecycle from design to sharing. It’s concise — you only write what you need to define — and reusable. It is machine readable API design that is actually human friendly.
The whole idea of API Governance is to achieve better design and reusability. RAML supports reusable design patterns. It’s a bit difficult to learn but once you get the hang of things, writing API Specs feel natural. Unlike Swagger, you just need to maintain a single specification. One single raml file for your entire service.
A sample RAML file looks like this.,
#%RAML 1.0
title: Demo API
baseUri: http://localhost:3000/api/{version}
version: v1
protocols: [HTTP]
types:
  Message:
    type: string
    description: Success / Error message to be shown to users
/:
  get:
    description: Root of the API
    responses:
      200:
        description: API is working fine
        body:
          application/json:
            example: {
              message: 'API is working fine'
            }
            properties:
              message: Message
Being the new kid on the block, there are few disadvantages with RAML. It lacks strong documentation, limited tooling, and a very small community. Postman doesn’t even support RAML 1.0 yet and it’s not even in their roadmap.
In a nutshell, we needed the following solutions.,
- A way to let team managers and leads to review and approve the API Specs written by developers.
- A way for our backend developers to document the APIs.
- A way for our frontend developers to mock the API contracts.
An API validation layer for our APIs.
Mulesoft’s Anypoint API Manager satisfies most of the requirements of API Governance. This product is similar to SwaggerHub and just like SwaggerHub, it’s a paid solution. We were looking for Open source alternatives. We had to come up with our own in-house solutions.
We developed a product called zDock ( short for Zolo API Documentation and Mocking Solution). The context diagram for the product goes something like this.,
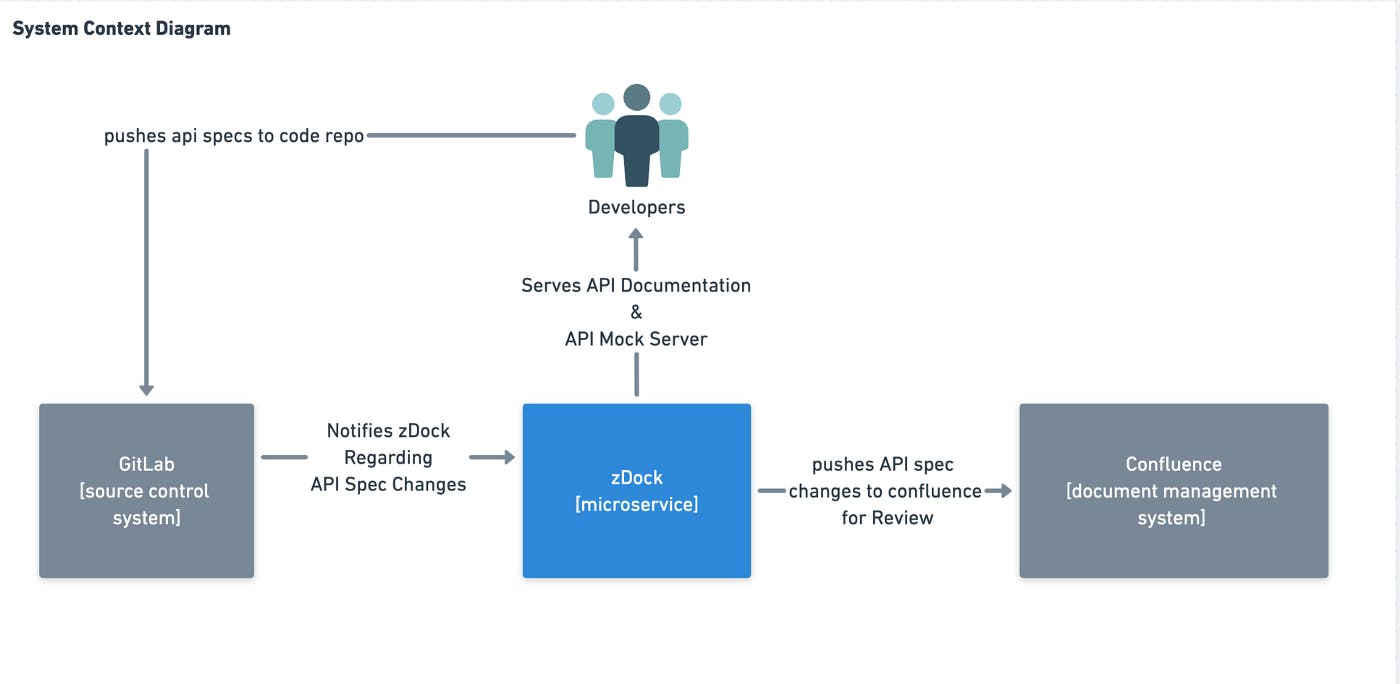
I will try to explain the diagram with respect to the requirements we had.,
(1/4) A way to let team managers and leads to review and approve the API Specs written by developers.
Instead of writing APIs directly, our developers first write RAML files and push it to Gitlab (our VCS) where we placed event triggers that get fired every time code get’s committed. These triggers call the API endpoint of zDock and zDock analyzes the commit and identifies the RAML files among the committed files and posts them to Confluence. An email is sent to the managers and the leads with the Confluence page link. We chose confluence because we were already using it for our Wiki and it has good features like highlighting and commenting on the code which made the review process seamless.
I might have actually oversimplified the whole review process because there are a ton of hurdles to cross. Primarily to post an API Spec as a Confluence page requires converting RAML to HTML. There are converters out there but Confluence is very stringent when it comes to taking HTML and only supports basic HTML tags. So we had to convert RAML to Markdown and then convert Markdown to HTML before sending it to Confluence for review.
The below code converts RAML to Markdown.,
const raml2html = require('raml2html');
// convert RAML to markdown
const convertRAMLtoMarkdown = async (ramlFilePath, templatePath) => {
  try {
    const configWithCustomTemplate = raml2html.getConfigForTemplate(templatePath);
    return await raml2html.render(ramlFilePath, configWithCustomTemplate, {
      pretty: true
    });
  } catch (e) {
    throw e;
  }
};
The function convertRAMLtoMarkdown takes two parameters. First is the RAML file path and the second is the template path. We used nunjucks for templating. The custom templates used for zDock are.,
You can know more about nunjucks here .
Once we had the Markdown, we had to convert it to HTML. We used showdown for this.
const showdown = require('showdown');

// convert markdown to html
const convertMarkdownToHtml = (md) => {
  const converter = new showdown.Converter({
    simplifiedAutoLink: true,
    tables: true
  });
  return converter.makeHtml(md);
};
(2/4) A way for our backend developers to document the APIs.
Since we did not go ahead with Mulesoft or SwaggerHub, we had to custom design a database to store the APIs. We used MongoDB for this purpose. Using the same Gitlab event triggers, we stored the RAML files in S3 and stored the S3 location in the database. The primary challenge was to figure out a way to visualize the RAML files. As I mentioned earlier there are opensource tools available to convert RAML to HTML but none of them were good enough.
After some digging, we found an opensource alternative, SwaggerUI but it only takes OpenAPI as input. So we did the unspeakable. We converted RAML to Swagger and used SwaggerUI for visualization of our APIs. We used oas-raml-converter. For command-line interface.,
oas-raml-converter --from RAML --to OAS30 api.raml > api.json
If you are using a Node.js application then.,
const converter = require('oas-raml-converter');
const fs = require('fs');
// convert raml to swagger
const convertRAMLtoOpenApi = async (ramlFilePath, openApiFilePath) => {
  try {
    const raml10ToOas20 = new converter.Converter(converter.Formats.RAML, converter.Formats.OAS20);
    const convertedData = await raml10ToOas20.convertFile(ramlFilePath);
    // save raml to file
    await fileUtil.writeToFile(openApiFilePath, convertedData);
  } catch (e) {
    throw e;
  }
};
// write content to file
const writeToFile = (filePath, content) => {
  return new Promise((resolve, reject) => {
    fs.writeFile(filePath, content, {}, function (e) {
      if (e) reject(e);
      else resolve();
    });
  });
};
The above function convertRAMLtoOpenApi takes 2 parameters. The first one is the source path where the RAML file is present. The second parameter is the destination where the OpenAPI file will be stored.
First, we define the converter object with the desired specifications. In our use case, it’s RAML to OAS20 (OpenAPI 2.0).
const raml10ToOas20 = new converter.Converter(converter.Formats.RAML, converter.Formats.OAS20);
Then we call the async method which takes the RAML file as input and converts to OpenAPI.
const convertedData = await raml10ToOas20.convertFile(ramlFilePath);
Finally, we save the file to the disk using the following method.,
// write content to file
const writeToFile = (filePath, content) => {
  return new Promise((resolve, reject) => {
    fs.writeFile(filePath, content, {}, function (e) {
      if (e) reject(e);
      else resolve();
    });
  });
};
The final result looks something like this.,
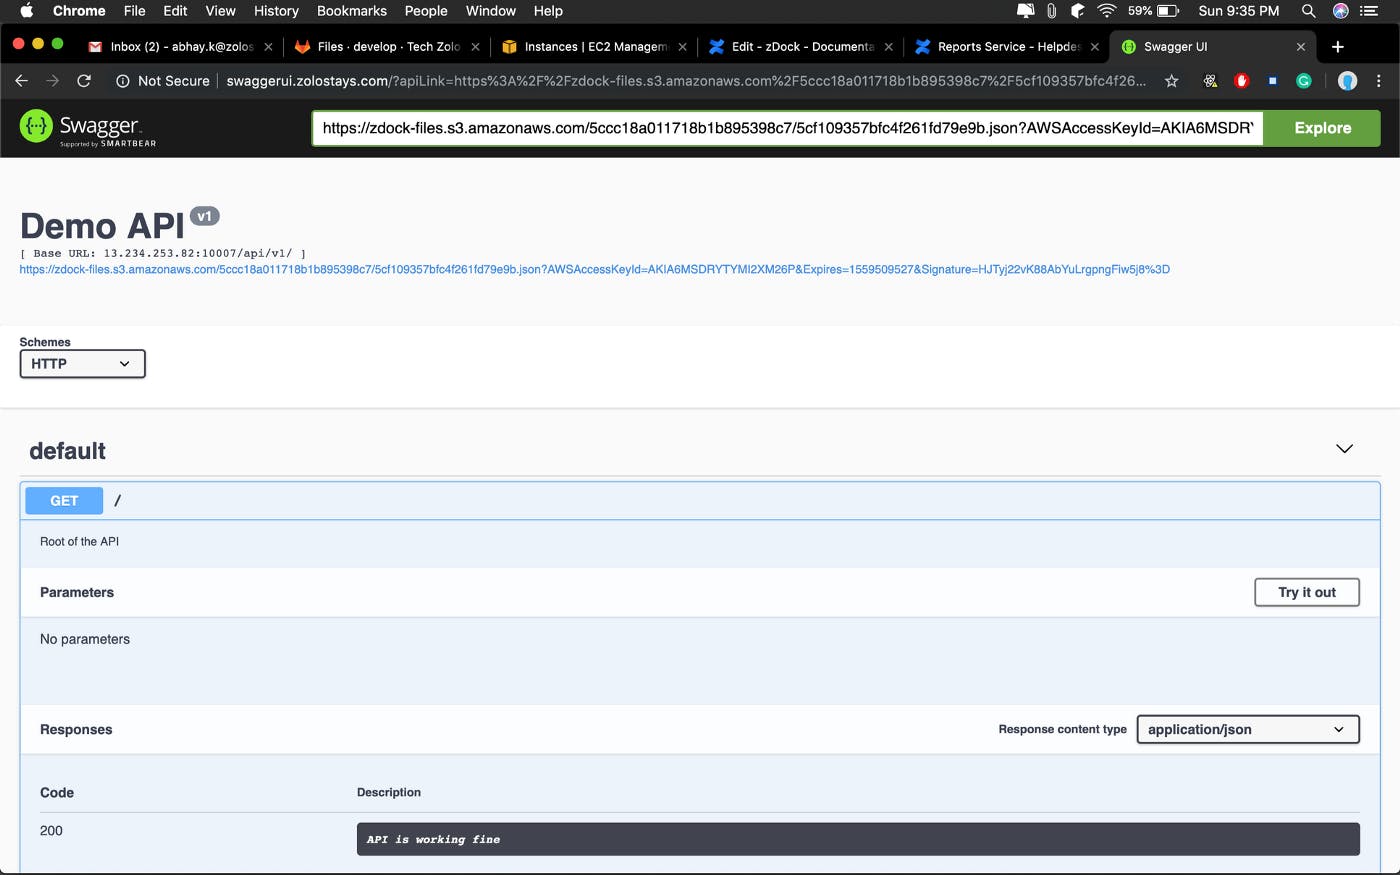
(3/4) A way for our frontend developers to mock the API contracts
Frontend developers include our Web Developers as well as Android and iOS developers. Every single one of them relies on these Contracts for developing their POJO classes or Factory Interfaces.
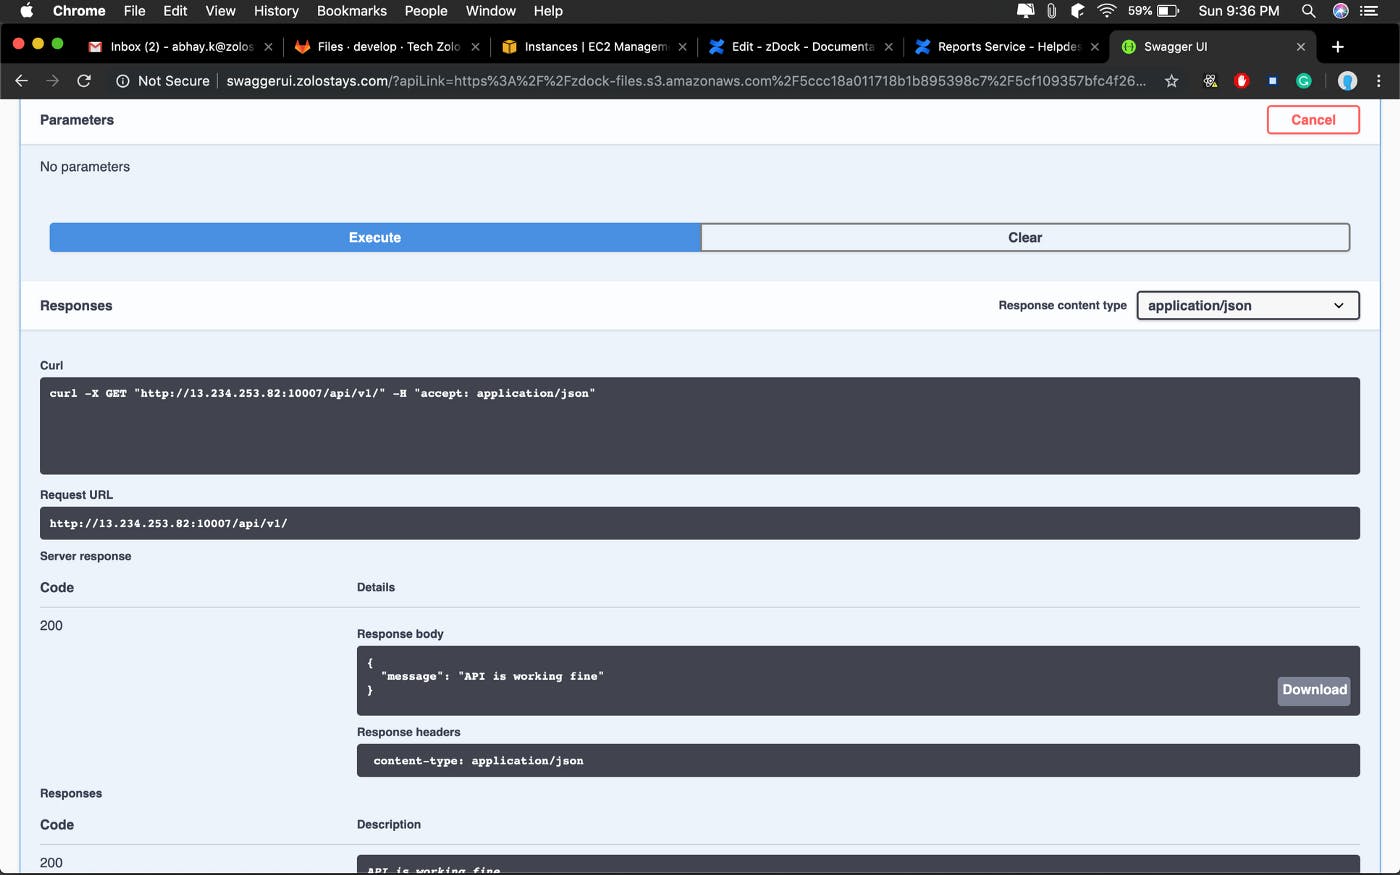
Now that we have OpenAPI files with us, we pushed them to S3 and used Swagger UI for visualizing. We still needed a mock server to let work with Swagger UI. Luckily RAML has very good mock servers available. We used osprey-mock-service.
osprey-mock-service -f api.raml -p 9000
In Node.js there is no library that can be used to start the mock server so we use the shell execution to achieve the same.
// start or restart mock server
const startOrRestartMockServer = async (port, ramlFilePath) => {
  try {
    shell.exec(`kill -9 $(lsof -t -i:${port})`);
    shell.exec(`osprey-mock-service -f ${ramlFilePath} -p ${port} --cors &`, { async: true });
  } catch (e) {
    throw e;
  }
};
In the above code, first, we stop any process running on the port where we want our RAML Mock server to run.
shell.exec(`kill -9 $(lsof -t -i:${port})`);
Then we start the new server by providing the path.,
shell.exec(`osprey-mock-service -f ${ramlFilePath} -p ${port} --cors &`, { async: true });
It is important to note that we use cors and { async: true }. Else the execution will stop the moment we execute the shell script.
(4/4) An API validation layer for our APIs.
API Validation is one of the key features of API Governance. This is also a key security concern. Hackers will try to take advantage of poorly written or insecure APIs to extract sensitive information.
For example.,
POST /login?email=<email>&password=<password>
# Hackers can use tools like wireshark or metasploit for capturing the secure information

GET /resource?limit=100000
# Hackers can overlaod the database and capture all the data
The best way to restrict them is by allowing only those APIs which are defined in the API Spec. This is achieved in two ways.,
- Addition of RAML validation in the application layer (middlewares)
- Addition of RAML validation in the network layer (using CDNs like Akamai)
There is a definite increment in the latency because of this but that is the price we pay to keep the REST endpoints secure.
We used osprey for our Node.js Backend.,
const osprey = require('osprey');
osprey.loadFile(path.join(__dirname, 'api_spec/api.raml'), {})
  .then(function (middleware) {
  app.use('/api/'+version, middleware, indexRouter);
  app.listen(port, () => {
    console.log(`listening to requests on port ${port}`);
  });
}).catch(function(e) {
  console.error("Error: %s", e.message);
});
If there any errors in the raml file, an error will be thrown before starting the server. But using CDNs for RAML validation is the way ahead.
(Optional) We needed validators to help developers debug RAML.
Popular IDEs have plugins for supporting RAML. In the case of Intellij, we used the RAML Plugin for Intellij.
In Command-line, we can run the following to debug RAML using raml-js-validator.
raml-validate api.raml
The support for RAML has been growing day by day and with an increase in developer adoption and continuous open-source contributions, we can finally count on RAML for writing concise and reusable API Specs.
I have obviously not explained in detail each step of the whole automation process because it goes beyond the scope of this article. However, if you have any questions, feel free to post in the comments.
Verdict
After implementing zDock, in a matter of week’s time, we were able to review and document 9 microservices. These services include close to 150 APIs. Our Frontend team was able to start designing Web Pages and App views as soon as RAML files were committed.
Of course, this was not easy. Our developers had to learn RAML and implement it for every single API they developed. We had to conduct multiple sessions and reiterate our process multiple times to make it work.
Know more about
If you are into DevOps or Fullstack and find terms like ServiceMesh, Infrastructure Automation, Event Loop and Micro-Frontends exciting as much as we do, then drop us a line at join-tech@zolostays.com. We would love to take you out for a Coffee ☕ to discuss the possibility of you working with us.